Vive la Stinking Rose
Marci Tsohonis
from the Sept/Oct '16 issue of The Essential Herbal
Marci Tsohonis
from the Sept/Oct '16 issue of The Essential Herbal

You’ll find yourself in good company whether
you love it or hate it. It was shunned
in proper medieval society, along with aromatic relatives, including chives,
onions, leeks and shallots. Other
periods and cultures embraced it as both food and medicine, reaching back to
the Egyptian Dynasties.
I have been surprised to encounter a few holdouts in my own circle of
acquaintances that still choose to buy garlic powdered, granulated or already
peeled (possibly floating in a jar of inferior oil) from the grocery
store. Multitudes of online recipe or
cooking apps, and fresh garlic at every farmer’s market today have probably
narrowed that gap a bit. Inquiry usually
reveals that their Mom just used powdered garlic, or no garlic, or they didn’t
know how much to use, or how to peel it, or they hoped to save time. I hope to clarify some of those issues in
this article.
We plant over two hundred cloves of garlic every October. I confess I am something of a foodie, and I
never want to be without it. It sounds like
a lot, maybe more than you would want.
But when you consider that much garlic only makes about 24 braids, it
puts it in perspective. I use fresh
garlic to enhance soups, stews, grains, vegetables, meats and some bread
recipes in addition to making herbal remedies like Fire Cider and Garlic Honey
for cold care. We gift garlic braids to friends and neighbors, and keep at
least a dozen out of every harvest for ourselves for use in cooking and seed
garlic.
Fresh garlic adds an earthy complexity of flavor that truly has no
substitute in good cooking.

Peeling garlic:
Some garlic peels easier than others, but most of it is easily removed once
the garlic has cured. There are two
inexpensive, indispensible tools I have found that make peeling garlic quick
and painless. The green tube is an official garlic peeler
that I wish I’d invented!

It sells for
under $7 and is the best tool, ever. You
just place a clove in the tube and roll it a couple times on the counter, and
the skin will pop off any garlic. The
blue rubber circle is actually a freebie, flat rubber jar opener that is placed
on the lid of a jar to give you extra twist leverage. I tried it on garlic one time when I couldn’t
locate the green tube, and it was a great hack. Try one or the other if peeling lots of
cloves of garlic at once.
Finding the seed cloves:
Are you considering planting some garlic this fall? It is easy to find excellent garlic in areas
with good garden or kitchen shops. In
Portland and Seattle, stores offer it in bins separated by variety, priced by
the pound, with tongs and paper bags to place the cloves in for weighing. Some farmer’s markets boast garlic vendors,
too. I always peel a clove if I’m
buying local garlic, and bite it in half.
It should be pure creamy white, with no green spot in the center, and crisply
hard and juicy. If the garlic is still
green, it was harvested too early. Good
vendors won’t mind if you check for that.

The garlic in your local super-market, though fine for eating, may have
been grown in another country. It may
not be suitable for your climate or growing zone, and your first garlic growing
adventure could be disappointing. Ask
around, talk to local gardeners. If you
can’t find a local, knowledgeable supplier of garlic, you will find many online
sources that offer organic, non-GMO seed garlic. Seed catalogs are another source. All will assist you to purchase quality
garlic for your specific climate or growing zone.
Buy enough garlic so you can set-aside seed cloves for the next years crop
from the current years harvest. Most
heads of garlic have 7-8 cloves in them.
Designate whole braids as seed garlic so you don’t forget to save some
for seed! We did that once.
 My favorite garlic is the hard-necked, red-skinned Spanish Roja. It has been wildly popular in the Pacific
Northwest since it first showed up in Portland, OR around 1901, and has been on
the increase, gardener to gardener, ever since. It is not yet available in most grocery
stores, even in Portland. Roja is spicy,
somewhat sweet and easier to peel than some varieties. It
grows well in the NW because of the long cool season and cooler nights. It would probably grow poorly in the southern
climates. Climate definitely
matters. With just a little research you
will find your own garlic superstar and live happily ever after.
My favorite garlic is the hard-necked, red-skinned Spanish Roja. It has been wildly popular in the Pacific
Northwest since it first showed up in Portland, OR around 1901, and has been on
the increase, gardener to gardener, ever since. It is not yet available in most grocery
stores, even in Portland. Roja is spicy,
somewhat sweet and easier to peel than some varieties. It
grows well in the NW because of the long cool season and cooler nights. It would probably grow poorly in the southern
climates. Climate definitely
matters. With just a little research you
will find your own garlic superstar and live happily ever after.


Soil Requirements:
If you are familiar with good gardening practices, you are likely aware
that crop rotation is just about the most important organic method to reduce
disease and pest issues and insure a healthy supply of nutrients. In a small garden it can be tough to find
enough room to plant in a different area of fresh soil every year. Some people get around that issue by just making
sure no specific plant is grown for more than one year in the same spot. So, if you just have a small garden, take
heart. Do what you can, and your garlic
will reward you. It is very hardy.
The garlic in your local super-market, though fine for eating, may have
been grown in another country. It may
not be suitable for your climate or growing zone, and your first garlic growing
adventure could be disappointing. Ask
around, talk to local gardeners. If you
can’t find a local, knowledgeable supplier of garlic, you will find many online
sources that offer organic, non-GMO seed garlic. Seed catalogs are another source. All will assist you to purchase quality
garlic for your specific climate or growing zone.
Planting: (mid-to-late October, in our area)

Break open the heads of garlic that you want to plant. Plant each clove about 2 inches deep, in dry
soil, with the skin still attached and the pointy side up. There is no need to soak them or peel them
first, despite info to the contrary online.
Gently cover cloves with soil and tamp down the soil, but do not pack it
down too hard. Water thoroughly. Now, let the cold winds blow and ignore it
till spring!
In the spring, garlic is always the first green growing thing we see. We get heavy snow in our area, but once the
snow melts it is obvious that 3-inch tall, slimy, pale green garlic stems were
growing underneath the blanket of snow.
If you discover that, do not worry about the garlic. The garlic stems will be a healthy green color
within a couple of weeks.
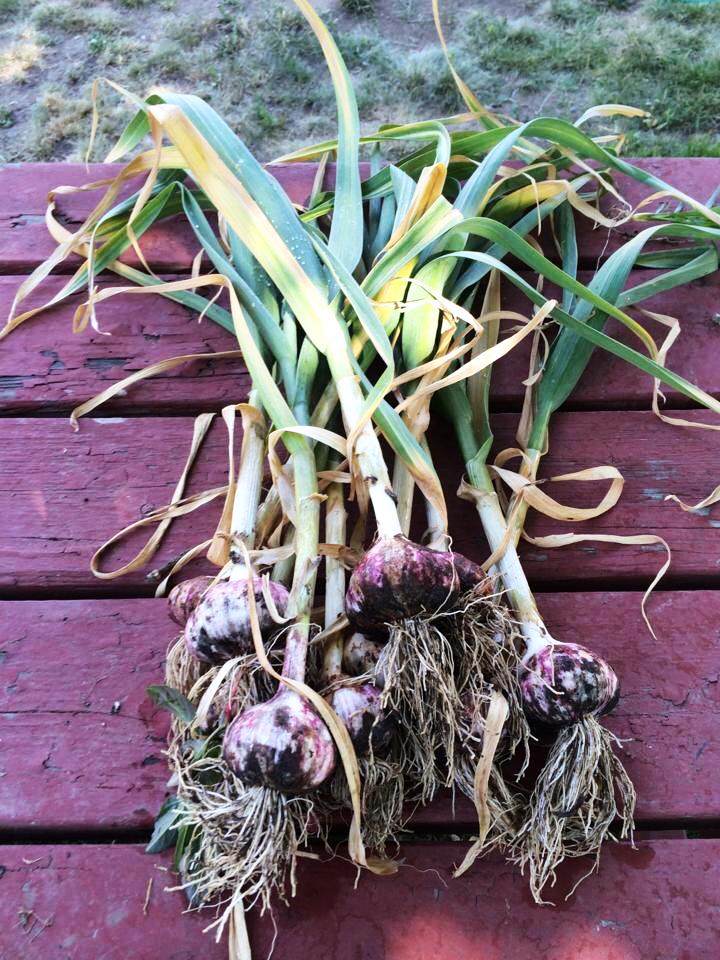
How to know your garlic is ready to harvest:
Hard necked garlic grows curly garlic Scapes, alerting you that it is
almost time to harvest and giving you a flavor teaser.

Scapes can be diced and
used exactly like garlic in recipes.
Soft necked garlic varieties do not grow scapes. A major clue that garlic is ready to harvest
is when the lower leaves above ground are turning brown. The surest way to know it is ready is to
simply harvest a garlic plant, and cut open a clove. Grasp firmly with your hand at the base of
the plant, and kind of twist, jiggle and pull.
They usually break loose fairly easily.
Peel a clove and cut it in half.
If there is any green visible in the center of the clove, it is still
“green”, and needs another week (or two) in the ground.
Braiding it:
The most beautiful garlic braids are made from soft-necked garlic
varieties. All garlic can be braided,
and, I think, should be, even if they aren’t real pretty. Braids of 10-12 heads of garlic will hang in
a barn or basement nicely, allowing a slow, cool cure with good air
circulation. If you pre-soak just the
stems of the garlic for an hour, right after pulling them out of the ground,
(and braid them right away) it will make braiding them much more manageable. So, split your harvest into segments spaced over
a few days, based on what you can manage, time-wise. We sometimes hose off our garlic heads
because our climate is so dry we don’t have mold issues. A safer, more universal method is to simply
use a soft bristled toothbrush to brush off soil that clings to the garlic
heads and whiskers. Don’t trim off the
garlic whiskers till it is cured.
Start with a 3-strand braid, and add a 4th (French braid style), holding and adding two stems as if they were one, then
another, until all heads have been added.
When you are done adding garlic heads, wrap/loop wire or twine over the
skinny part of the braid, every inch, all the way to the tip with a light gauge
reinforcing wire or twine. Also wrap
horizontally between each head, ascending.
If you are feeling particularly crafty, create a loop with the top,
skinny part of the braid, and secure it at the back of the braid on the
opposite side. The arched part of the
braid then becomes the hanging loop.
Your braid will stay pretty as it dries and will make a wonderful
gift.

We planted soft-necked Inchelium garlic last fall, in addition to Roja, as
I wanted to be able to have a stunning garlic braid photo for this
article. Unfortunately, even soaking
the Inchelium garlic stems didn’t soften them.
They were as stiff as tree trunks!
On the plus side, the Inchelium garlic is hot, spicy and tasty. None of our braids look great this year, but
they work. There are many sites online
that will take you through every detail of braiding garlic when you are ready
to harvest next summer.
I want to share a couple tasty recipes you can use your fresh garlic in, so
you’ll get hooked on growing it.
Roasted garlic: This will bring anyone to
their knees, I promise. Spread on warm
French bread or add to meats, veggies, pizza or gravies. The flavor is nutty goodness that is out of
this world!
Cut a piece of heavy foil large enough to fold in half and line a small
pan. Preheat oven to 350/375
degrees. Cut just the tips (1/4 inch)
off the pointy end of a head of garlic.
Do not separate the cloves. Place
in the middle of the lower piece of foil.
Drizzle a little extra virgin olive oil over the tops of the garlic
heads. Seal with foil ad place in the
pan. Heat about 35-40 minutes. Garlic should be a golden color, and
soft. Remove from oven and squeeze the
heads at the bottom to pop out the delicious garlic cloves!
Dipping oil for warm French bread: (instead of garlic butter)
2-3 cloves garlic, smashed and chopped
¼-1/3 cup Extra Virgin olive oil
¼-1/2 tsp. salt
Dash of Balsamic vinegar (optional)
¼-1/3 cup Extra Virgin olive oil
¼-1/2 tsp. salt
Dash of Balsamic vinegar (optional)
On low heat, simmer chopped garlic with salt in olive oil for about 10
minutes. Stir in vinegar, if using. Serve in small bowls at table to dip French
bread in.
Happy autumn! Marci