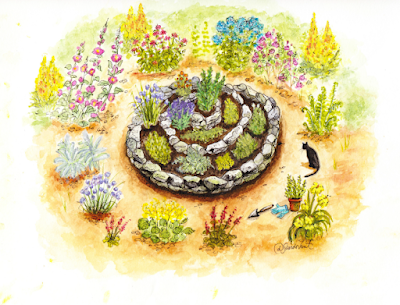
Spiral Herb Garden by Debra Sturdevant
Originally published in the May/June '16 Essential Herbal
Through time the spiral has represented movement between inner and
outer worlds to a path leading from outer consciousness to the inner soul. It
has been found in both native American archaeology as well as ancient Celtic
lands where designs still bear the spinning form and can be seen anywhere from
three-spiral triskele jewelry to landscape designs worldwide and often utilized
in meditational gardens as spiral pathways. The spiral is found quite often in
nature seen in vines, seashells, wind patterns, water whirlpools, unfurling
fern heads, and the spinning of our planet to only name a few. It seems to be a pacifying design and since I
look to mother nature for insight and direction I decided to display my own
Celtic connections and set about making a spiral garden.

The materials for making a
spiral garden are possibly free if you have stones on your property easily
obtainable but if not, bricks, cement blocks or practically anything that can
hold soil in place and be layered can be used to construct it. The next
consideration is placement and an herb garden, especially one as condensed as a
spiral, is always nicest close to your kitchen for easy access. A wheelbarrow,
shovel, several used cardboard boxes opened out flat, gravel, small stone
chunks, rich garden soil, 1-2 bags of potting soil, and your choice of
herbs. Keep in mind that you are
basically building a “permaculture” system which is an efficient
self-sustaining eco-system. Your spiral will contain herbs that have different
needs growing in one compact area. The natural force of gravity drains the
water naturally down to the base. You create a micro climate allowing you to
plant a large variety of herbs. The pinnacle where the spiral is highest dries
faster and is warmest being a perfect area for Mediterranean herbs like
rosemary and lavender to the base where the water naturally filters for herbs
that are happier in wetter or shadier conditions like parsley, chives &
mints. You also have a side that will be sunnier and one that remains shadier
and cooler. When planting you will want to choose your back and top areas for
the taller herbs so as not to shadow the smaller ones. The stone spiral absorbs
the sun by day keeping the plants warm through chilly nights as well. Add in
flowering herbs like chamomile, calendula and nasturtiums to attract
pollinators like bees and butterflies, bringing color and beauty to your spiral
creation as well as better health to the rest of your gardens. Gather your
rocks picking ones that will stack solidly reserving any rounded ones for the
top layer. It will take a few wheelbarrow loads to construct a spiral.

2. As your spiral goes
inward you will be layering your rocks to progressively to reach a height of
approximately on to one and ½ yard high in the very center. You will want to
use smaller broken rock pieces in the center of the spiral bottom to help take
up some space before adding soil and it will help keep your formation from
tumbling down as you build. You can use mortar to tack the rocks in place as
you build layers if you want a truly permanent and stable structure. We
experience a great deal of frost in the northeast so it wouldn’t survive the winter
without mortar here as our ground freezes and thaws. Mossy or rounded rocks
look beautiful used on the very last top layer and I scattered a few small
fossil and river rocks here and there to give it an ancient look.
3. Now you add your rich
composted garden soil gently patting it in followed by a few inches of potting
soil. Gently water and let sit a day or two before planting to be certain you
don’t need more soil.
4. Plant your herbs
keeping the micro climates, shade & sun in mind. Your perennials will
spread and grow so leave enough room between plants to accommodate those that
are prolific. The mints will need to be controlled with occasional removal of
under shoots. You can end the spiral with a cap stone or dig a little pond to attract
frogs and lizards that will help control unwanted insects and provide moisture
for your moisture loving plants.
This is a fun and rewarding project that takes little expense
especially if you have divided herb plants and will be a stunning focal point.
It’s convenient to take a basket and clippers out to gather so many herbs in
one spot. Have fun!
The Author:
Debra
Sturdevant is an artist and herbalist living in the adk foothills of upstate
NY.
She has
lectured and demonstrated herbalism and wildcrafting for Cornell and formulator
functions across the state since 1997. She lives with husband Bob in her
beloved childhood home on her wild hill with many felines, old family dog, and
barnyard of chickens where she writes, paints, gardens and runs her eclectic
herb, soap & art shop. She especially loves rendering botanical nature
studies and themes in watercolors from her endless subjects that grace the
country meadows, hedgerows, woods and lakes. www.thecountryartist.com


