TEH Sept/Oct '17
by Marci Tsohonis

The wheel turns and autumn beckons. The herbs of summer are starting to lag a bit, and the evenings are a bit chilly. My Calendula flowers are going to seed almost faster than I can gather them. Calendula mostly self-sows, but for reasons unknown, that process has twice gone awry. I freeze some seeds in a small canning jar; just to be sure I have them. If this is the first year you have grown Calendula you may be surprised by the appearance of the seeds. The seeds are very hard and shaped like little crescent moons or worm larvae. Be assured, they are only seeds!
If I could only grow one herb,
it would have to be Calendula. A more soothing, useful plant is hard to
imagine. Oil infusions of the sweet, spicy, resinous flowers lend a
special magic to soap and other body-care formulas. Herbalists and grannies through the centuries used Calendula
as a healing remedy for wounds and other skin conditions. I often use Calendula
tea, also. It is anti-inflammatory, a wound wash, soothing to
conjunctivitis as an eye-wash, fights infection, hastens healing and is
soothing to minor burns or scalds.

Calendula oil softens the skin,
soothes eczema and helps to keep the skin nourished and supple. Calendula
makes a beautiful, soothing salve for chapped hands, nicks or scrapes.
You should have plenty of time to
make infused Calendula oil for this soap recipe, using one of the following
methods.
SOLAR INFUSED CALENDULA OIL:
Fill any size jar half full of dried
or semi-dry Calendula petals or chopped flower heads. Fill the jar with olive
oil to within 2 inches of the top of the jar. The flowers can expand once
they become saturated with the oil, so leave a little headspace and give it a
good stir. Cover the top of the jar with a double layer square of
cheesecloth or a piece of an old t-shirt, and apply the screw band (or a rubber
band) over that. Place in a sunny, south-facing windowsill for at least 6
weeks. Stir daily.

MUCH FASTER CALENDULA OIL:
Place dried Calendula flower heads
or petals in a crock-pot and cover them with olive oil. I suggest you use
the lowest heat setting on your crock-pot and keep a close eye on it. I
prefer keeping the temperature in a range of 110-120 degrees for about 10
hours. If the oil gets too hot the flowers will get crispy. That
seems to me to work against the idea of preserving their wonderful, delicate
properties.
TO INTENSIFY COLOR

TO FURTHER INTENSIFY COLOR: Add 2 TBSP. Annatto seed to the lye solution just
after dissolving lye crystals to water. (Do this in addition
to adding Annatto infused oil ) Allow lye solution to cool as usual, and try
not to panic when you see how murky and brown the solution looks. It will
be fine. Strain the annatto seeds off as you are adding the lye solution
to the fats and oils. Using both the oil and the lye water
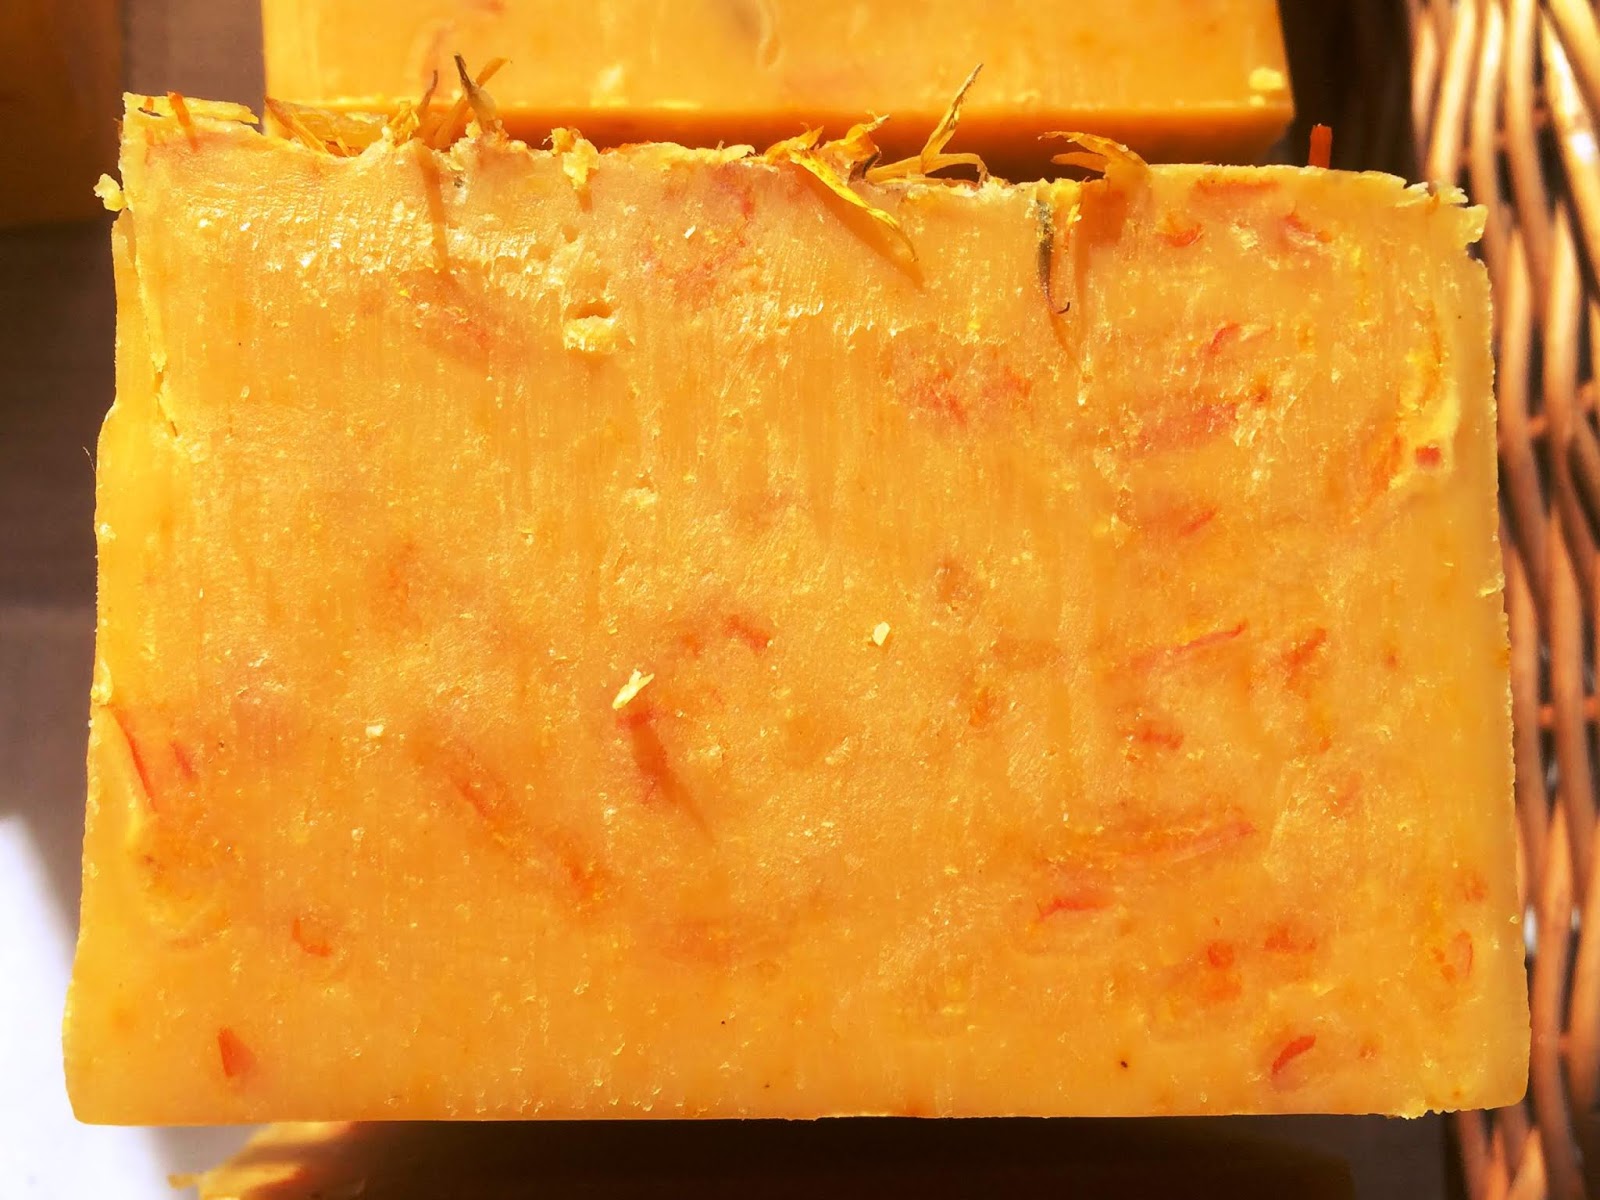
infusion will make your soap a rich orange-yellow.
CALENDULA SOAP:
This cold process soap recipe makes
approximately 66 ounces of soap.
You should have a basic
understanding of soap making safety precautions and procedures before
attempting this or any other soap recipe. If you do not, please visit The
Essential Herbal Magazine page. You will find a link to Basic Soap Making
safety by Alicia Grosso, posted on the bottom of the page. Or Click HERE
FIRST, PREPARE THE MOLD:
If you are using a
wooden flat or log mold, line it with freezer paper and cut an extra sheet of freezer
paper to fit the inside dimensions of your flat mold. You’ll apply it shiny side down onto the surface of the
poured soap before you place the wooden lid on
it. Locate an old towel or blanket you can use to insulate the
mold.
If using a silicone mold lightly spray it with Pam spray and set
aside. Place all tools and ingredients in your soap making area.
Cut freezer paper to place on top of the filled, silicone mold to prevent the
accumulation of white soap ash on top of the poured soaps.
MIX THE LYE SOLUTION:
Wearing chemical proof gloves and
face protection, weigh the Sodium Hydroxide granules. Also weigh the
distilled water. Using a long handled stainless spoon, slowly add the
Sodium Hydroxide granules to the distilled water, and give it a few quick
stirs. Vapors will rise briefly as the water heats up. (I leave the
area for a few minutes to allow the vapors to clear) Carefully secure the lid
to the pitcher. Allow the Lye solution to stand an hour or two to cool
down before using it.
15.00 oz water
6.25 oz sodium hydroxide
2 TBS. Annatto seed (optional, added
after lye dissolved in water)
OPTIONAL: If using a silicone mold, stir 1 T. of Sodium Lactate
into lye solution.
WEIGH FATS AND OILS:
24 oz Calendulated Olive
oil (solar or crock pot method) Plus 1 oz oil, see below!
15 oz Coconut oil
3 oz Mango butter
1 oz Palm Kernel oil
Place the fats and oils
into the soap kettle.
OTHER INGREDIENTS:
2 TBSP. Annatto seed
1 oz olive oil
Heat in microwave in
25-second intervals. It will get quite dark. Add to melting fats or at
trace.
½ cup of semi-dry
Calendula petals pulled off the flower heads and set aside.
THERE ARE NO ADDED
ESSENTIAL OILS IN THIS RECIPE.
MAKE SOAP!
Wearing face and neck protection,
and chemical proof rubber gloves, carefully remove the lid of the lye solution
pitcher. I place the pitcher on a damp washcloth to stabilize the
base as I pry off the lid to avoid lye spills.
You will use the stick mixer as a manual-stirring
tool, first, while adding the lye solution to the fats and oils (Don’t plug it
in, yet!). Rest the top of the pitcher of lye solution lightly on the
edge of the crock-pot. Add the lye solution in a steady, thin stream,
stirring manually in a constant, gentle, circular motion with your stick mixer
until all the Lye solution has been added.
Plug in the stick mixer and turn it
on, using the low speed setting. Keeping the stick mixer in contact with
the bottom of the crock-pot, begin to mix in a figure 8 or circular
motion.
After about 2 minutes, take your
finger off the power button to stop the motor again on the stick mixer.
Lift the mixer blade above the surface of the fats and oils, and wave the stick
mixer lightly over the surface, testing for “trace” by dragging a drip line
through the air just above the surface of the soap. If the drip trail
falls back in to the soap, turn the mixer on and continue mixing another minute.
Repeat until the drip trail is clearly visible on the surface of the
soap batter.
The trail will be thin and flat
at light “trace,” and will quickly melt back into the liquid soap. Full
trace is when the contents of the soap pot thicken to resemble pudding and
a very definite, raised glop or trail stays on the surface of the liquid soap, without
falling back in) Full trace will work great for this recipe.
Stir the ½ cup of Calendula petals
into the traced soap.

TUCK IT IN:
Pour soap mixture into your
mold.
Apply a sheet of freezer paper cut
to the exact measurements of the mold, shiny side down, on the surface of the
poured soap. The easiest way to do it is to line up one edge of the freezer
paper with a short end of the mold, and lower it gradually across the surface
of the poured soap, lengthwise, while pressing gently away from you with the
straight edge of a ruler or other tool. The purpose is to achieve
full surface contact with the freezer paper, which helps to prevent air pockets
or that powdery white soap ash from forming on the surface of your soap.
Insulate the mold and/or place mold
on electric heating pad to keep soap warm and force gel if you want maximum
color in your soap. Gel begins in the center of the soap, and moves
outwards to the edges. The process can take about 40-60 minutes once
gel begins. A soap that gels will usually be
firm enough to slice once it has cooled to room temperature.

Happy autumn! Marci
No comments:
Post a Comment